
Noise is probably the most-common problem in amateur podcasts. Professional podcasts sound great not just because of the equipment, but also because of techniques. Learn some ways to reduce noise before and after you record.
Reduce noise before you record
Turn off noise-makers
Fans, air conditioners, refrigerators, computers, and more can all cause background noise in your recording; try to turn them off if you can. I turn off my air conditioner whenever I start recording because I have a loud vent right above my studio equipment.
Consider a different room
If you can't turn off noise-makers, such as an air conditioner or refrigerator, consider switching rooms. Pay attention to the carpet, walls, and furniture in the room. The less “flat” you can make the room, the less the sound will reverbrate.
Reduce computer fan noise
Turn your microphone away from the computer and place as far away as possible. If you use a notebook computer, try to minimize your running software to prevent the fans from activating.
Switch to a dynamic microphone
Condensor microphones can capture a beautiful range of audio, but they're more sensitive to noise from the room (great for ambiance recording). Dynamic microphones are traditionally not as good with the audio range (such as the low pitches), but are more focused in what they capture and aren't as sensitive to room noise. There are cheap dynamic microphones, but they won't have the wide dynamic range of audio that they can capture. There is also my prized Heil PR40 for $325, and it sounds beautiful.
Reduce the gain and get closer to the mic
The microphone won't eat you! Get closer to it! You may think this will distort your audio and you're right, but that's why you reduce the gain, which is the mic's sensitivity. The more sensitive the mic, the more noise it will capture. Imagine it like a bubble around your mic. Gain makes the bubble bigger, which captures more sound. Make the “bubble” smaller and get inside it!
Get a compressor/limiter/gate (CLG)?
Not really. I shared in-depth settings for Chris's Dynamic Compressor for Audacity, and also just discussed software and hardware compressors. CLGs are only effective at not allowing any audio in the spaces between your talking. It won't remove noise while you record.
Plug everything into one power outlet
When you get electronic interference with your hardware (as I still have in some of your recordings), keep all your hardware plugged into the same outlet via surge protector. Also ensure your hardware is not in close proximity with other pieces (like audio cables sitting on power adapters—I made this mistake recently).
Use a USB adapter
If you record directly into your computer, converting that analog audio signal to digital before in reaches your computer has proven an effective method for reducing computer interference noise. Get either an adapter with 3.5 MM jacks or a Behringer U Control UCA202 USB Audio Interface for RCA jacks. This works great for desktops and notebooks.
Removing noise after you have recorded
Do everything you can to reduce the noise before you record. It's possible to easily reduce it so much, that you won't need to removal the noise afterward. There are probably some of these steps you can implement to get better recordings. If you still need to edit things after you recorded, here's how to remove noise with Audacity.
- Select the “silent” section of your audio, where it's just noise.
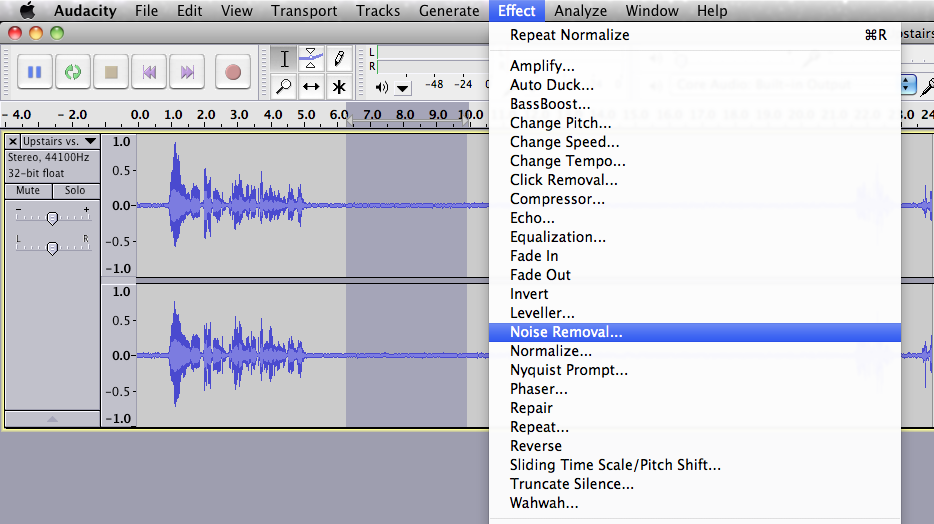
- Go to the Effects menu and click Noise Removal.

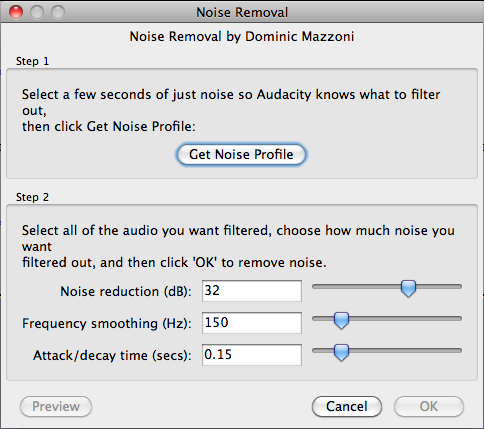
- Click Get Noise Profile.

- Select all of the audio from which you want that background noise removed.
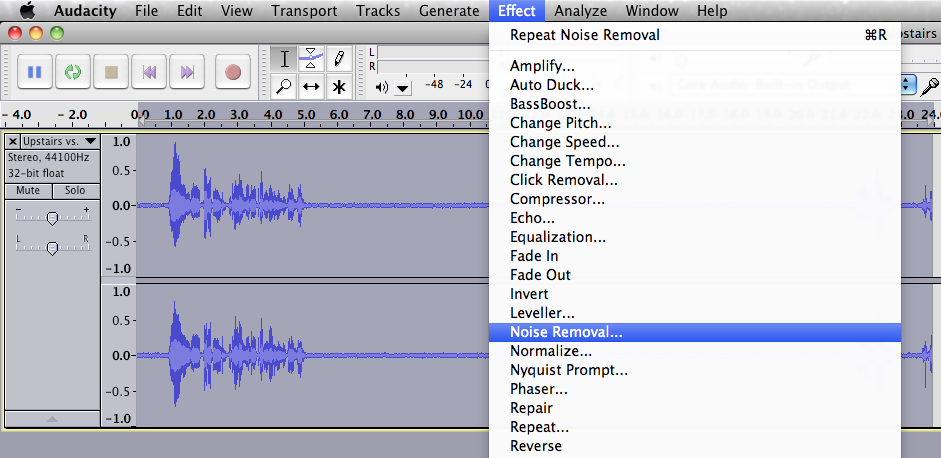
- Go to the Effects menu and click Noise Removal.

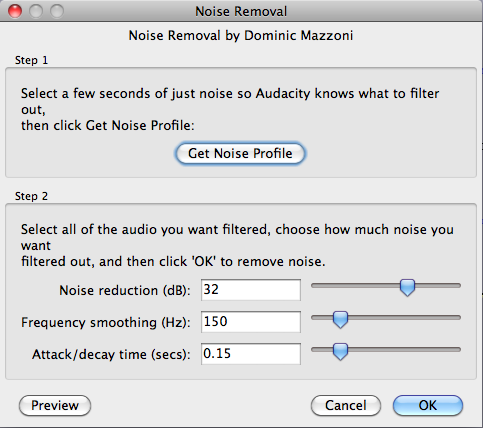
- Adjust the settings if necessary (defaults are fine) and click OK.

- Listen to ensure your audio doesn't sound like it's underwater.
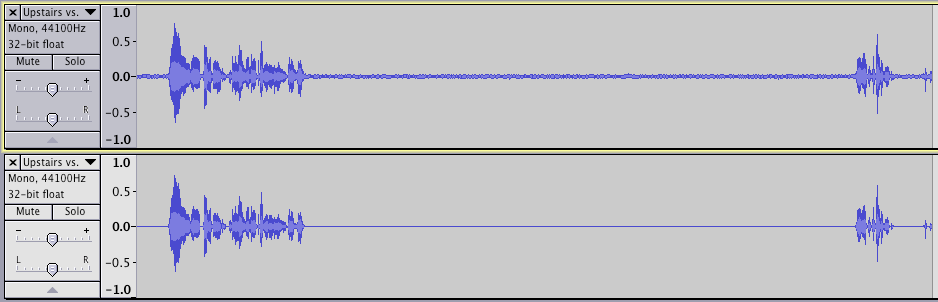
Here are the before-and-after waveforms.
No live shows for a while
I got married! Although I will have prerecorded episodes still released on a schedule, this was the last live recording for a while. After I'm married, I may rearrange the Ramen Noodle™ and The Audacity to Podcast™ to be live on the same night.
Need personalized podcasting help?
I no longer offer one-on-one consulting outside of Podcasters' Society, but request a consultant here and I'll connect you with someone I trust to help you launch or improve your podcast.
Ask your questions or share your feedback
- Comment on the shownotes
- Leave a voicemail at (903) 231-2221
- Email feedback@TheAudacitytoPodcast.com (audio files welcome)
Connect with me
- Subscribe to The Audacity to Podcast on Apple Podcasts or on Android.
- Join the Facebook Page and watch live podcasting Q&A on Mondays at 2pm (ET)
- Subscribe on YouTube for video reviews, Q&A, and more
- Follow @theDanielJLewis
Disclosure
This post may contain links to products or services with which I have an affiliate relationship and may receive compensation from your actions through such links. However, I don't let that corrupt my perspective and I don't recommend only affiliates.
Related Content


audacity is very good. i use it in my free time.
This is fab thanks!
Thanks! I'm glad that I could help.
You could also try Edit8 app for noise reduction
My recording sounds like its underwater to begin with…
Can you describe your recording equipment and process? There may be something along the way that is causing the problem.
is there a gate feature in Audacity
Hi, Mary! There isn't a great gate in Audacity, but you can use Chris's Dynamic Compressor as a gate. I explain how to use it (albeit an older version) in episode 5.
you just made another fan, thanks for the uber fast response Daniel!
Daniel
is chris' dynamic compressor available for 1.3 beta?
Yes, the exact same plugin works for either 1.2 or 1.3 beta. However, I highly recommend using the beta, as even the plugin will look better and be easier to use.
The effects and anlayze menu are greyed out.Why and how to over come them.I am using 1.3 beta and windows XPpro.TQ
You must have audio selected before you can run an effect or analyze it. Double click within the waveform to select an entire section (this will be the entire track, unless you have cuts), or click and drag across the section you want to edit, or click and the beginning and then shift-click at the end of the area.
hey Daniel! Cliff Ravenscraft sent me your way. I run Tuneplant Music Productions, and I'm looking to expand into the podcast market by making my services more affordable to start-ups. Would you like to chat sometime?
[…] to remove noise in Audacity https://noodle.mx/blog/2010/09/01/tap012-how-to-remove-noise-with-audacity/ ICT across the curriculum in Falkirk primary schools – Glow blog by Malcolm […]
[…] you can’t make it sound good. You can enhance what you record or even fix some glitches (like removing noise). But there’s no replacement for getting good audio in the first place.Testimonial on podcast […]
Hi Daniel. Will you please advise how to remove noise that is a result of editing?
(I have been trying to separate a track in Audacity into two sections, but whether I do this by leaving a gap with no audio or copy and pasting a very quiet piece in the middle it leaves an interference noise in that place as a result of the editing.)
Hi, Vicki!
This is a very strange issue and I would have to see the actual project, or at least a screenshot, to figure out what’s happening.
[…] the future, I have found multiple ways to reduce background noise. Background noise can be edited out in audio manipulation software after […]
Thanks!!
I recorded a very old cassette tape and there was a lot of over-noise – you could barely here the people talking (it was a recorded interview). When I followed your steps, it took away ALL the noise, including the interview. Is there a way to reverse it? What else can I try?
It sounds like your recording is simply too noisey.Faithfully,
Daniel J. Lewis
Grow your podcast from average to amazing! http://PodcastMasterClass.com
man i really very thankful to you cz i got great voice but dont knw the softwares and stuff u reallly help me out
[…] How to Remove Noise with Audacity – TAP012 – It won’t remove noise while you record. … If you still need to edit things after you recorded, here’s how to remove noise with Audacity. […]
I had recorded some of my audio by using my laptop and used audacity to remove background noise. 🙂 it worked
Yo can get a direct tutorial over here: https://www.youtube.com/watch?v=jqbXec-YcJU
Must share and comment 😀
I recorded a cassette tape on Audacity. Some segments of the tape had very low volume. Is there a way to increase the volume for that segment on par with the rest of the recorded music?
I specialize in helping podcasters, so you could try the same tool I recommend for them: http://auphonic.com
[…] out that white noise. All recording equipment catches some amount of white noise. Thankfully, removing it is very simple in most editing software and it adds a professional-quality sound to your […]
[…] sound issues have been excellently addressed on this device; features include in-call background noise reduction, audio boost enabling clear hearing of the other end of the line, and assorted […]
[…] out that white noise. All recording equipment catches some amount of white noise. Thankfully, removing it is very simple in most editing software and it adds a professional-quality sound to your […]
I followed your instructions on how to remove background noise, it worked ! but my recording now has a sound like a xxxx faucet high pitched what did I ddo wrong
That’s the unavoidable consequence of too much background noise and too much reduction. So back of the amount of reduction and accept some noise so as not to sacrifice understandability.
[…] Tutaj warto polecić redukcję szumów już nagranego dźwięku (można do tego użyć np. Audacity). Zajmuje to 5 minut, a efekty są naprawdę dobre. Kolejny krok to nagrywanie osobno wyjścia z […]
[…] Use the noise reduction tool on Audacity […]
[…] Noise removal is always necessary because the mice will always pick up ambient or background noise. […]
[…] Noise removal is always necessary because the mice will always pick up ambient or background noise. […]
I was wondering how do I remove background noice and with not removing voices?
Hi, Patricia! The instructions in this episode should help you do that. But your results may vary depending on the kind and loudness of your background noise compared to the voices you want to keep.
Hi Dan, we have a program that uses machine learning to remove any noise that isn’t the actual voice of a speaker. I think it could help you and other podcasters. You can see a demo at https://www.mokri.io/clean
It’s a neat API. Thanks for sharing!
It sounds very similar to what someone could get by using a DAW’s built-in noise-reduction tool.
just a small question if i had an audio that contains people talking but got edited and a song was added to the that audio and it has a very high amplitude that you can’t hear people properly can you tell me please how to remove that noise?
The only way to fix it would be to go back to the original before the music was added.
Hey, are your podcasts anywhere else, like iTunes or Spotify? This was so helpful, thanks!
Yes, my podcast is in Apple Podcasts, Google Podcasts, Stitcher, Spotify, and generally everywhere podcasts are available.
Thank you for helping me better understand how to record sound and how Audacity can help edit those problem areas.
Wow! I find it amazing that such a talented actor as yourself is so involved in helping the community! Loved your acting in My Left Foot!
Fanboy aside, I tried everything before going to post- Audacity got rid of my noisy laptop fans perfectly with no distortion to my voice! (Helps that I have a low frequency voice I guess)
Thanks for the help!
LOL. I’m the Daniel J. Lewis, not the Daniel Day-Lewis. A simple look at my paycheck confirms it.
How come I don’t see Noise Removal as an option under Effects? I’m battling trying to get rid of white noise. I got a UMC22 box and while the mic sounds better there is white noise in the background.
That sounds like a problem with your Audacity installation. You might need to re-install or else get help from AudacityTeam.org.
Thank you so much for the simple instructions! It really helped me a lot! 🙂 more power!
hey, thanks so much. this is good stuff. you mrntioned having the room flat to reduce noise. are there specific materials one should move to get rid of more noise,such as something that might rattle from frequencies, such as change on top of a metal desk on wheels. a big exercise ball, hanging or posted paper that could make noise from wind (like from the hot air coming out of our mouths when we speak that could blow it) etc. in a nut she’ll, what materials help absorb extra background noise?
You want your room to be NOT flat. Flat surfaces reflect, angles defuse or deflect (like a stealth airplane), and soft things absorb. So soft furniture and loaded bookshelves work great. Or you can work on acoustic treatment with towels, acoustic panels, or similar.
Hi,
If i Am recording a video , getting music from another place, then how can i remove it after uploading a video. Can u give me a suggestion please..
If the music was mixed in with the voice, you won’t be able to remove it.
On noise reduction I don’t see what you see. I have “Sensitivity” going from 0-24 and “Frequency Smoothing Bands” which goes from 0-12. Also in ‘effects’ it’s called Noise Reduction and not Noise Removal. I’m pretty sure I have the latest version of Audacity. So I’m wondering what the default would be.
Also When you click ‘get noise profile’ – am i right in assuming that you don’t ‘get’ or see anything?
You’re right about not seeing anything when you get the noise profile.
This episode was released many, many years ago, so I’m not surprised that Audacity has updated the options and interface since then.
this is fabulous i love this
Excellent tips – thank you!!